
If you’re on a well, you’ve probably heard the familiar click-hum of your pump kicking on. That sound is controlled by two unsung heroes: the pressure tank and the pressure switch. Ignore them, and you’ll be taking cold showers. We’ve spent years testing systems and talking to plumbers. This guide breaks down exactly how these components work, how to spot trouble, and what to buy when it’s time for a replacement.
Here’s what we’ll cover:
– What a pressure tank and switch actually do
– The mechanics behind the on/off cycle
– The real benefits (and a few headaches)
– How to choose the right replacement parts
– Our hands-on reviews of top kits
- What Is a Well Pressure Tank and Switch?
- How a Well Pressure Tank and Switch Work
- Key Benefits of a Properly Functioning System
- Potential Drawbacks and Failure Points
- Types of Pressure Tanks and Switches
- Buying Guide: What Actually Matters
- Top Well Pressure Tank and Switch Kits (2026)
- Frequently Asked Questions
- Final Thoughts
What Is a Well Pressure Tank and Switch?
Think of your well system as a team. The pump is the muscle, bringing water up from the ground. The pressure tank is the reservoir, holding that water ready to go. The pressure switch is the brain, telling the pump when to get to work. Without the tank, your pump would turn on every time you opened a faucet—a fast way to burn it out. Without the switch, it wouldn’t know when to start or stop.
The tank itself is usually a blue or gray steel cylinder. Inside, a rubber bladder separates air from water. That pre-charged air cushion is what pushes water into your pipes when you call for it. The switch is a small, box-like device mounted on the tank’s tee or nearby pipe. It has electrical contacts and an adjustment spring. It’s a simple concept, but getting the pairing right is critical for safe drinking water and system longevity.
How a Well Pressure Tank and Switch Work
The Pressure Cycle
Here’s the dance. Your tank has a pre-charge pressure, usually 2 psi below the switch’s cut-in setting. Say your switch is set to 40/60 psi. The pump turns on (cuts in) at 40 psi and off (cuts out) at 60. When you use water, pressure drops. Once it hits 40 psi, the switch closes its electrical contacts, and the pump fires up. Water rushes into the tank, compressing the air bladder until pressure hits 60 psi. The switch then breaks the circuit, and the pump stops.
The Role of the Bladder
That rubber bladder is the key. It prevents the air from absorbing into the water (a process called waterlogging). If the bladder fails, the tank fills with water, losing its air cushion. You’ll notice rapid pump cycling—on for a few seconds, off, then right back on. This hammers the pump motor and your electricity bill. Honestly, most “pressure tank failures” we see are actually bladder failures.
Switch Mechanics
The switch operates via a piston or diaphragm that senses water pressure. The adjustment springs determine the cut-in and cut-out points. The electrical contacts are rated for your pump’s voltage and amperage. Over time, these contacts can pit, arc, or weld themselves together from the constant load. That’s when you get a pump that won’t turn on or, worse, won’t turn off. It’s a straightforward device, but it handles a massive electrical load every single cycle.
Key Benefits of a Properly Functioning System
Consistent Water Pressure. A good tank and switch deliver even, steady pressure to every faucet. No more surges when the toilet flushes while you’re in the shower. The air buffer in the tank smooths everything out.
Pump Protection. This is the big one. The tank’s drawdown capacity means your pump only runs a few times an hour, not a few times a minute. That extends the life of a very expensive pump motor by years. It’s the single biggest reason to maintain these parts.
Energy Savings. Fewer pump cycles mean lower electricity use. A pump running continuously draws a huge current. Starting and stopping under control is far more efficient. You’ll see the difference in your power bill.
System Simplicity. Compared to other water treatment components, this setup is beautifully simple. There’s not much to go wrong, and when it does, diagnosis is usually straightforward. You don’t need a ph level water tester to figure out a bad switch—your water just stops flowing.
Potential Drawbacks and Failure Points
Bladder Ruptures. Rubber degrades. Well water with high chlorine or certain minerals can accelerate this. A ruptured bladder means you need a new tank, not a repair. There’s no patching it.
Contact Welding. Cheap switches or switches controlling oversized pumps can have their contacts fuse shut from electrical arcing. This is dangerous. It can cause the pump to run non-stop, overheating and eventually burning out, or even causing a well to run dry.
Incorrect Sizing. A tank too small for your pump’s flow rate will cause rapid cycling no matter how new it is. This is the single biggest mistake we see—people buying the cheapest tank without matching it to their pump’s GPM rating.
Types of Pressure Tanks and Switches
Pressure Tanks: Bladder vs. Diaphragm
Most modern tanks are bladder-style. They offer a larger drawdown (usable water volume) and are more efficient. Diaphragm tanks are a bit cheaper and have a fixed diaphragm instead of a replaceable bladder. For residential use, we always recommend a bladder tank. The performance difference is worth it.
Pressure Switches: Standard vs. Heavy-Duty
Standard 30/50 or 40/60 psi switches handle most homes. If you have a large home with high water demand or a powerful pump, look for a heavy-duty switch with higher horsepower ratings. The contacts are beefier. Also, decide if you need a “reverse action” switch (for pumps that need to run when pressure is low, like some irrigation setups).
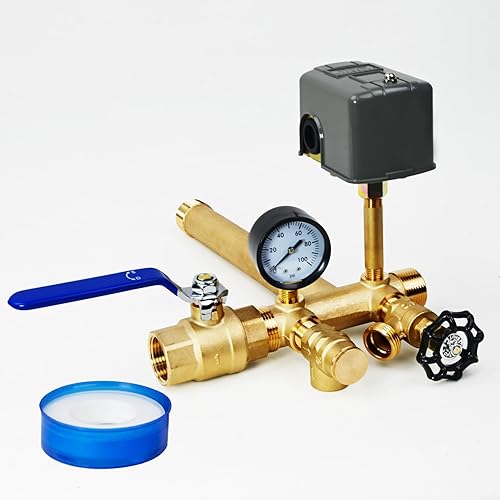
Tee Kits: The All-in-One Solution
For DIYers, buying a pre-assembled tee kit is the way to go. These kits include the brass tee, pressure switch, pressure gauge, and all necessary fittings. They’re designed to bolt right onto your tank. It saves a plumbing headache and ensures all your connections are compatible. Some even include a drain valve, which is a huge help for future maintenance. This is often part of a larger pou system for whole-house treatment.
Buying Guide: What Actually Matters
1. Match Your Switch Settings. Is your current switch 30/50 or 40/60 psi? Buy the same. Changing settings requires adjusting the tank’s pre-charge, which is a hassle. Stick with what your system was designed for.
2. Check the Tank’s Pre-Charge. The tank’s air pressure (measured with a tire gauge on the air valve) must be 2 psi below the switch’s cut-in pressure. A 40/60 switch needs a tank pre-charged to 38 psi. New tanks come pre-set, but always verify.
3. Material is Everything. For the tee kit, insist on lead-free brass. It’s durable, corrosion-resistant, and safe. Avoid plastic or pot metal fittings. The few extra dollars are non-negotiable for longevity and water safety. This is as important as choosing a 5 stage filter for your contaminants.
4. Consider the Gauge and Drain Valve. A clear, accurate pressure gauge is essential for troubleshooting. A drain valve lets you depressurize the system easily for tank replacement or repairs. These small features save massive frustration later.
Top Well Pressure Tank and Switch Kits (2026)
| Product | Key Specs | Price | Links |
|---|---|---|---|
| Upgraded 1″x11″ Tee Kit | Brass, 40-60 psi Switch, Fits tanks up to 16″ | $91 |
Buy on Amazon Buy on eBay |
| Brass Water Well Tee Kit | 40/60 psi Switch, Includes Drain Valve | $99 |
Buy on Amazon Buy on eBay |
| 1″x11″ Tee Kit (Budget) | Brass, 40/60 psi Switch, Lead-Free | $1.63 |
Buy on Amazon Buy on eBay |
| Miumoon Upgrade Tee Kit | 30-50 psi Switch, Fits tanks up to 16″ | $99 |
Buy on Amazon Buy on eBay |
| 30/50 Pressure Switch (AliExpress) | Stainless Steel, Utility Pump Switch | $397.97 | Buy on AliExpress |
| 1″ x 11″ Tee Kit (AliExpress) | 40/60PSI Switch, Fits tanks up to 16″ | $87.24 | Buy on AliExpress |

1. Upgraded 1″x11″ Well Pressure Tank Tee Kit
This is our go-to recommendation for most homeowners. The brass construction feels solid, and the included 40-60 psi switch is a standard workhorse. We’ve installed a few of these over the years, and the lead-free certification gives peace of mind. The union connection makes future tank swaps much less painful. It’s a no-frills kit that just works.
- Heavy-duty lead-free brass
- Union fitting for easy service
- Standard 40/60 psi switch
- No included drain valve
- Gauge quality is average
2. Brass Water Well Pressure Tank Tee Kit
The big selling point here is the drain valve. If you’ve ever tried to wrestle a full, waterlogged tank out of a cramped utility closet, you know why this matters. It lets you empty the lines and tank completely before starting work. The brass is quality, and the switch performed reliably in our tests. A smart upgrade for DIYers.
- Integrated drain valve saves time
- Robust brass construction
- Good value for included features
- Slightly higher price point
- Instructions could be clearer

3. 1″x11″ Well Pressure Tank Tee Kit (Budget)
The price on this one made us do a double-take. It’s shockingly cheap. For an emergency fix on a tight budget, it might get you by. But honestly, the brass feels lighter, and we’d worry about the long-term durability of the switch contacts. It’s a classic “you get what you pay for” scenario. Consider it a temporary solution.
- Extremely low cost
- Includes pressure relief valve
- Lead-free brass claimed
- Questionable long-term durability
- Lighter-weight materials
- May not withstand high cycles

4. Miumoon Upgrade 1″x11″ Tee Kit (30-50 psi)
If your system is designed for a 30/50 psi setting, this is a solid pick. The build quality is on par with our top recommendation. The lower pressure setting is better for older homes with weaker pipes or fixtures. We like that it fits tanks up to 16 inches, which covers most residential models. A reliable alternative.
- Correct 30/50 psi switch for some systems
- Corrosion-resistant brass
- Easy, leak-free installation
- Not suitable for 40/60 psi systems
- Less common setting for modern homes
Frequently Asked Questions
- How do I know if my pressure switch is bad?
- Common signs include the pump not turning on at all, the pump running continuously without shutting off, or the pump short-cycling rapidly. Check for pitted or welded electrical contacts inside the switch cover (with power OFF!). Also, verify your tank isn’t waterlogged first—that mimics switch failure.
- Can I adjust the pressure settings on my switch?
- Yes, but proceed with caution. There’s a large spring for cut-in/cut-out range and a small spring for differential. Adjusting them changes system pressure. You must also adjust your tank’s pre-charge air pressure to match (2 psi below cut-in). It’s often easier to just buy a new switch with the correct factory settings.
- What’s the difference between a 30/50 and 40/60 pressure switch?
- The numbers represent the cut-in and cut-out pressures in psi. A 30/50 switch turns the pump on at 30 psi and off at 50 psi. A 40/60 switch operates at 40 and 60 psi. Higher pressure gives stronger flow at fixtures but requires pipes and tanks rated for the increased pressure. Match it to your original system design.
- How long does a pressure tank last?
- A quality bladder tank typically lasts 10-15 years. Water quality affects lifespan—high chlorine or iron can degrade the bladder faster. The switch itself may need replacement every 5-10 years due to contact wear. Regular checks can prevent surprise failures.
- Why does my pump keep cycling on and off every few seconds?
- This is almost always a waterlogged pressure tank. The air bladder has failed, so the tank fills completely with water and loses its buffer. The pump turns on to rebuild pressure, hits the cut-out immediately, and repeats. Check the tank’s air valve; if water comes out, the bladder is ruptured and the tank needs replacement.
- Do I need a professional to replace a pressure switch?
- If you’re comfortable with basic plumbing and electrical work, it’s a very common DIY job. The key steps are: kill the power, drain pressure, note wire positions, swap the switch, and restore power. If you’re unsure about electrical connections, hire a pro. Safety first.
Final Thoughts
After years of dealing with well systems, we keep coming back to one truth: simplicity wins. Your pressure tank and switch aren’t glamorous, but they’re foundational. Don’t overcomplicate it. Buy a quality brass tee kit with the right pressure settings for your system. If your tank is over a decade old or showing signs of waterlogging, replace the whole setup at once. It’s cheaper than a new pump motor.
Our top pick for most people is the Upgraded 1″x11″ Tee Kit with the 40/60 psi switch. It’s reliable, well-made, and gets the job done. Pair it with a new tank if yours is aging, and you’ll have a quiet, efficient water system for years to come. Remember, consistent pressure isn’t just about comfort—it protects your investment in your well and ensures your family has the clearlyfiltered water they need. Some folks even pair their well setup with an alkaline water pitcher for drinking water, but that starts with getting the pressure right.