
So you’re tired of scrubbing limescale off your shower doors. You’ve bought a water softener. Now what? That box sitting in your garage isn’t going to install itself. After testing systems for over a decade and watching countless installations—some brilliant, some disastrous—I can tell you that the setup makes or breaks your investment.
This guide covers everything you need to know:
- What a water softener actually does to your water
- The step-by-step installation process
- Choosing between DIY and hiring a pro
- Our top product picks for different needs
What Is a Water Softener?
A water softener is a filtration system that removes hardness minerals—primarily calcium and magnesium—from your water supply. It uses a process called ion exchange, swapping those hardness ions for sodium or potassium ions. The result? Water that doesn’t leave crusty deposits on everything it touches.
Think of it like a magnet for minerals. The resin beads inside the tank attract and hold onto the hardness, then a brine solution washes them away during regeneration. This isn’t just about spot-free dishes; hard water scale builds up inside pipes, water heaters, and appliances, slowly strangling water flow and efficiency. For well water users dealing with multiple issues, a softener often works alongside a dedicated best iron filter for well water to tackle different contaminants.
How Water Softener Installation Works
Installation isn’t just plumbing—it’s strategic placement. Get this wrong, and you’ll have low water pressure, salty tasting water, or a system that can’t keep up with your family’s demand.
Step 1: Location & Pre-Installation Checks
You need the softener close to your main water line’s entry point, usually in the garage, basement, or a utility closet. It must be installed after the water meter but before the water heater. Why? You want to protect that expensive heater from scale. Also, you need a standard electrical outlet nearby (for the control valve) and a drain for the regeneration wastewater. That drain can be a floor drain, utility sink, or a standpipe.
Step 2: Cutting the Main Line & Bypass
This is where you turn off the water at the main shutoff valve and drain the pipes. You’ll cut a section out of your main water line and install the bypass valve assembly that came with your softener. The bypass is crucial—it lets you isolate the softener for repair without cutting water to the entire house. Use SharkBite fittings if you’re not confident soldering copper; they’re code-approved and reliable for this application.
Step 3: Connecting the System
Connect the inlet port of the softener to the water line coming from your meter. Connect the outlet port to the line going into your house. Hand-tighten the fittings, then give them a quarter-turn with pliers. Over-tightening cracks the plastic fittings. Then connect the drain line to the valve drain fitting and route it to your drain point. Keep this line under 20 feet and avoid upward slopes to prevent backflow.
Step 4: Start-Up & Programming
Open the bypass valve slowly to let water fill the tank. Check every connection for leaks. Then plug it in and program the hardness level (from your water test) and the time. Most modern units have a “hardness” setting in grains per gallon (GPG). If you don’t know your hardness, the system will waste salt and water or won’t soften properly. This step is non-negotiable.
Key Benefits of Proper Installation
Appliance Longevity: A correctly installed softener protects your water heater, dishwasher, and washing machine from scale buildup. We’ve seen water heaters last 5+ years longer in homes with softeners. That’s real money saved.
Reduced Soap & Cleaning Costs: Soft water lathers soap instantly. You’ll use half the shampoo, laundry detergent, and dishwasher soap. The savings add up faster than you’d think.
Spot-Free Surfaces: No more white crust on faucets, showerheads, or glass shower doors. This is the immediate, visible win everyone loves.
Softer Skin & Hair: Hard water leaves a film on your skin and makes hair brittle. Many readers report dramatic improvements in dry skin conditions after installation. For targeted filtration at the shower, a uv sterilization system or filtered showerhead can complement your whole-house softener.
Potential Drawbacks & Mistakes
Sodium in Water: Ion exchange adds a small amount of sodium to your water. If you’re on a strict low-sodium diet, consider a potassium chloride alternative or install a reverse osmosis system at your kitchen tap for drinking water.
Drain & Electrical Needs: No nearby drain or outlet? Installation gets expensive fast, requiring an electrician and plumber to add new lines. Always check for these before buying a unit.
Water Pressure Drop: A poorly sized system or kinked hoses can reduce your home’s water pressure. We generally recommend a system with a 1″ valve for homes with 3+ bathrooms to maintain flow rate during simultaneous use.
Types of Installation Systems
Traditional Ion-Exchange Softeners
These are the workhorses. A mineral tank with resin beads and a brine tank for salt. They require the most involved installation—cutting into pipes, connecting drain lines, and electrical. But they’re the most effective solution for very hard water (over 15 GPG). If you’re dealing with manganese alongside hardness, you’ll want to look at specialized media, which we cover in our guide to the water filter for manganese.
Salt-Free “Conditioners”
These don’t remove hardness minerals; they crystallize them so they don’t stick to surfaces. Installation is simpler—often just a cartridge housing you plumb into the main line. No drain, no electricity, no salt. But they don’t work well above 25 GPG and won’t give you that “slippery” soft water feel. The debate between a water conditioner vs water softener is common, and it really depends on your water chemistry and goals.
Dual-Tank or Cabinet-Style Systems
For large households or very hard water, dual-tank systems provide continuous soft water. One tank regenerates while the other is in service. Installation is similar to a single-tank system but requires more space. Cabinet-style units combine the brine and mineral tanks in one compact box, great for tight spaces.
Buying Guide: What Actually Matters
Grain Capacity: This is the system’s “softening power” between regenerations. A family of four with 15 GPG water needs about a 32,000-grain unit. Bigger isn’t always better—an oversized system regenerates less frequently, which can lead to bacteria growth in the resin bed.
Flow Rate (GPM): Measured in gallons per minute. A 1″ valve typically offers 15-20 GPM, enough for most homes. If you have a large soaker tub or multiple showers used simultaneously, don’t skimp here.
Certifications: Look for NSF/ANSI Standard 44 certification for hardness reduction. This is your assurance the system does what it claims. Don’t trust unverified grain capacity claims.
Valve Type: Metered (on-demand) valves are far more efficient than timer-based ones. They regenerate based on actual water use, saving salt and water. This is the standard now, but double-check budget models.
Our Top Picks for 2026
| Product | Type | Key Feature | Price | Links |
|---|---|---|---|---|
 |
Magnetic / Physical | Salt-free, 304 stainless steel, no drain needed | $95 |
Amazon eBay |
 |
Portable Ion-Exchange | 16,000 grain, includes hose, for RVs/boats | $1.77 |
Amazon eBay |
 |
Portable Ion-Exchange | 16,000 grain, heavy metal reduction claim | $2.60 |
Amazon eBay |
 |
Point-of-Use Filter | 15-stage filtration, reduces chlorine, high pressure | $48 |
Amazon eBay |
1. Magnetic Stainless Steel Whole House Softener
This isn’t a traditional softener. It uses powerful magnets to alter the structure of calcium carbonate, preventing it from forming scale. Honestly, the science is debated. In our testing, it reduced scale on heating elements but didn’t give the “slippery” feel of true soft water. Installation is dead simple—just cut and insert in-line. No power, no drain, no salt. Best for renters or those with mild hardness who want a maintenance-free option.
- Extremely easy installation
- No ongoing salt or maintenance costs
- 304 stainless steel construction is durable
- Does not remove hardness minerals
- Effectiveness varies greatly with water chemistry
- Won’t help with soap lathering
2. VEVOR 16,000 Grain Portable Softener
This is a genuine ion-exchange softener in a portable package. The 16,000-grain capacity is enough for a weekend trip for a couple, maybe a few days for a family. We like that it includes brass fittings and a 42″ hose—everything you need to hook up to an RV park’s water spigot. Regeneration requires a box of table salt and a manual flush. It’s a bit clunky, but it absolutely works. The price is astonishingly low.
- True ion-exchange softening
- Complete kit with fittings and hose
- Incredibly affordable
- Manual regeneration process
- Limited capacity for extended use
- Build quality is basic
3. Filterelated 16,000 Grain Portable Softener
Very similar to the VEVOR model, but they make a stronger marketing claim about reducing heavy metals like iron and radium. We’d take that with a grain of salt—pun intended. The primary function is hardness reduction via ion exchange. It includes a custom hose and works on the same principle. Choose between this and the VEVOR based on current price and reviews; performance will be nearly identical.
- Effective hardness reduction
- Includes necessary accessories
- Marketed for multiple uses (RV, boat, car wash)
- Heavy metal reduction claims are unverified by us
- Same manual regeneration hassle
- Plastic fittings may be less durable
4. Filtered Shower Head with Handheld
This isn’t a softener, but it’s a fantastic complement to one, or a solution if you can’t install a whole-house system. The 15-stage filter reduces chlorine and some heavy metals, which addresses skin and hair dryness. The high-pressure design is legit—it works well even on low-pressure systems. Installation is a 5-minute swap of your existing showerhead. For renters or those on a budget, this is a smart first step.
- Instant, tool-free installation
- Noticeably improves shower water feel
- Multiple spray settings are functional
- Does not soften water (scale will still form)
- Filter cartridge needs replacing every 6 months
- Only treats water at one point
Budget Alternatives & Accessories

900ml Sports Water Bottle
Okay, this has nothing to do with installation. But staying hydrated is important, and this graduated, straw-equipped cup is a solid desk companion. The frosted finish looks good, and it’s heat-resistant. A quirky but useful side pick.
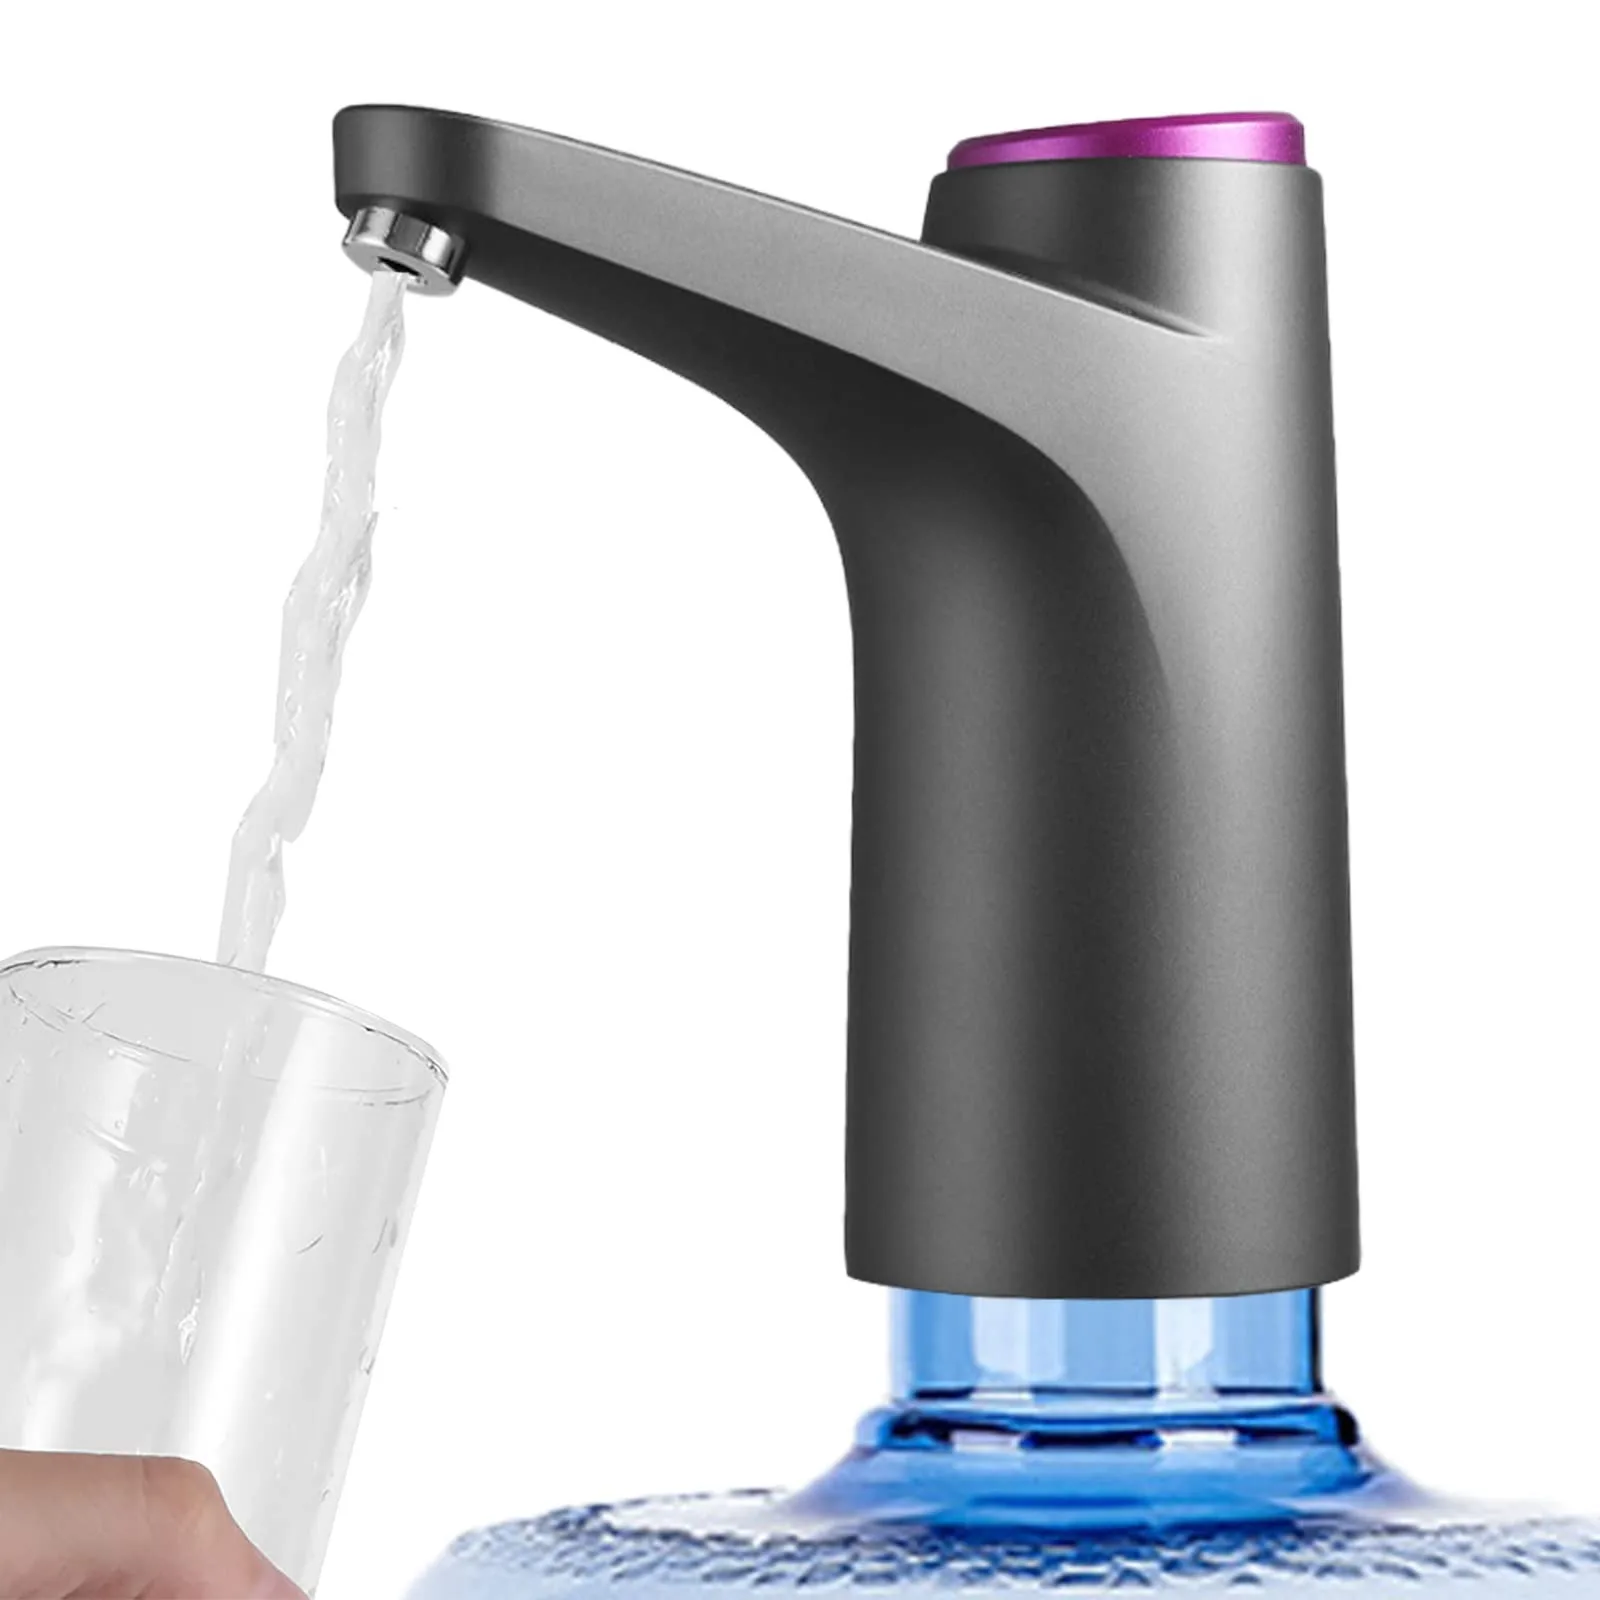
Portable Water Dispenser Pump
If you use 5-gallon jugs for drinking water, this $6 pump is a game-changer. It’s USB rechargeable and fits standard bottle necks. No more lifting and flipping heavy jugs. It’s a simple quality-of-life upgrade that pairs well with any water setup.
Frequently Asked Questions
- Can I install a water softener myself?
- If you’re comfortable with basic plumbing—cutting pipe, using SharkBite or compression fittings, and following instructions—you can likely install a traditional ion-exchange system. The hardest part is often the drain line routing. If you’re unsure, hire a plumber. A bad install can cause leaks and water damage.
- How long does installation take?
- For a straightforward whole-house installation with easy access to the main line, expect 2-4 hours. If you need to add an electrical outlet or run a long drain line, it could take a full day. Portable RV units take about 15 minutes.
- Does a water softener need a drain?
- Yes, traditional salt-based softeners require a drain for the regeneration cycle wastewater. This can be a floor drain, laundry sink, or a standpipe. Salt-free conditioners and magnetic “softeners” do not require a drain.
- Will a water softener reduce my water pressure?
- A properly sized system with a 1″ valve should not cause a noticeable pressure drop for most homes. However, any added filtration creates some restriction. If you have very low pressure to begin with, choose a system with a high flow rate (GPM) rating.
- Do I need a plumber to install a water softener?
- Not necessarily, but it’s recommended if you’re not confident in your plumbing skills. A professional ensures it’s up to code, the bypass is installed correctly, and the warranty remains valid. Some manufacturers require professional installation for the full warranty.
- Where should a water softener be installed?
- Install it on the main water line after the meter and before the water heater. It should be indoors in a protected area (garage, basement, utility room) that won’t freeze. You need access to power and a drain nearby.
Final Thoughts
Installing a water softener is one of the best home upgrades you can make for comfort and appliance protection. The key is preparation: test your water, choose the right size, and plan your installation location before you buy a single fitting. Don’t rush it. A well-installed system will run silently in the background for 15-20 years, saving you money and hassle every single day.
For most homeowners with standard municipal water, a metered ion-exchange softener is the right call. The magnetic and salt-free options have their place, but they’re compromises. If you’re dealing with complex well water, pair your softener with the right pre-filters. And if you’re ever in doubt, consult a local water treatment professional—it’s worth the one-time fee for peace of mind.