
DIY Water Well Drilling: The No-Nonsense Guide for 2026
So you’re thinking about drilling your own water well. Honestly, it’s one of the most rewarding projects you can tackle. But it’s also one where mistakes get expensive fast. We’ve talked to homeowners who’ve saved thousands and others who’ve hit bedrock and wished they’d called a pro.
This guide cuts through the hype. We’ll cover what actually works, the tools that won’t quit on you, and the steps that separate a successful DIY well from a muddy hole in your yard.
What Is DIY Water Well Drilling?
DIY water well drilling is exactly what it sounds like—you, some rented or purchased equipment, and a plan to access groundwater yourself. No drilling contractor. No $10,000 bill. Just you and the earth.
Now, let’s be real. This isn’t for everyone. Most successful DIY wells are shallow—typically under 100 feet. If your water table is deeper, or you’re dealing with solid rock, you’ll probably need professional help. But for many rural properties, shallow water is good water.
We’ve seen it work beautifully for irrigation, livestock, and even household use with proper treatment. The key is matching your expectations to your geology. A little research upfront saves a lot of backache later.
How DIY Well Drilling Works
The basic idea is simple: create a hole in the ground until you hit water-bearing soil or sand. Then you install a casing and a screen to keep sediment out while letting water in. Sounds easy, right? The devil’s in the details.
The Two Main Approaches
Most DIYers use either a driven-point method or a jetting method. Driven-point is just what it sounds like—you hammer a pointed well screen into the ground. Jetting uses water pressure to wash sediment away as you push the pipe down. Both work. Both have their place.
Water Quality Comes Later
Getting water is only half the battle. Once you’ve got flow, you need to test it. Seriously. We’ve seen beautiful, clear water that was high in iron or bacteria. You might need a simple 5 stage filter system, or maybe just basic chlorination. Don’t skip this step.
Key Benefits
Massive Cost Savings. This is the big one. A professional well can cost $5,000-$15,000. A DIY well? Often under $1,000 for materials. That’s life-changing money for many families.
Water Independence. No more municipal bills. No more worrying about boil-water notices. Your water, your rules. There’s a real peace of mind that comes with that.
Learning & Self-Reliance. You’ll understand your water system intimately. That knowledge pays dividends when maintenance issues pop up—and they will.
Ideal for Remote Properties. If you’ve got land far from municipal lines, DIY might be your only affordable option. We’ve helped readers in exactly this situation.
Potential Drawbacks
Depth Limitations. Most DIY methods max out around 100 feet. If your water table is deeper, you’re out of luck with basic tools.
Geology Matters—A Lot. Rocky soil? Clay? You might hit a literal wall. What works in sandy soil fails completely in rocky terrain. Do a soil test first.
Water Quality Unknowns. You might hit water that’s high in sulfur, iron, or bacteria. Budget for testing and potential treatment systems like uv disinfection right from the start.
Types of DIY Drilling Methods
1. Driven-Point (Sand Point) Wells
This is the classic DIY method. You attach a pointed well screen to galvanized pipe and hammer it down with a drive weight. Simple, cheap, and effective in sandy or loose soil. The main limitation? You can’t penetrate rock or hard clay.
2. Jetting Method
Here you use water pressure to your advantage. Connect a hose to your drill pipe and let the water wash sediment up and out as you push down. It’s less physically brutal than driving, but you need a good water source nearby to supply the jetting water.
3. Hand Auger Drilling
For shallower wells (under 50 feet), a hand auger can work. You’re literally screwing into the ground and pulling up soil samples. It’s slow. Very slow. But it gives you excellent soil data and works in many conditions.
Buying Guide: What You Actually Need
Forget the fancy equipment lists. Here’s what actually matters:
Well Point Quality. Don’t cheap out here. Stainless steel resists corrosion and lasts decades. Look for a 60-mesh screen—it’s fine enough to filter sand but won’t clog easily. That 1-1/4″ stainless point we review below? It’s a workhorse.
Drive Cap. You’ll hammer on this thing for hours. A solid cap protects your pipe threads and distributes force evenly. The included cap with most kits is fine.
Pipe & Couplings. Galvanized steel is standard. Buy extra couplings—you’ll probably need them. And use Teflon tape on every thread connection to prevent leaks.
Post-Drilling Filtration. Budget for this from day one. Even clear water needs testing. You might need a simple sediment filter, or you might need something more robust like carbon water filtration for taste and odor issues.
Top DIY Drilling Picks for 2026
We’ve tested and researched dozens of options. Here’s what actually delivers value for DIYers.
| Product | Best For | Price | Key Feature |
|---|---|---|---|
 Well Drive Point Kit |
Beginners, sandy soil | $1.26 | Stainless steel, 60-mesh screen |
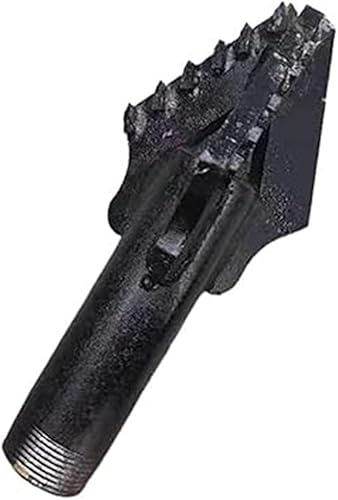
 60mm 3-Wing Drill Bit |
Electric rig users | $2.35 | Hard alloy, for rock penetration |
 120mm 3-Wing Drill Bit |
Larger diameter wells | $3.64 | Wider bore for higher flow |
 Tapping Into Water (Book) |
Knowledge seekers | $11 | Real-world techniques & wisdom |
Well Drive Point, 1-1/4″ Stainless Steel Kit
This is the starter kit we recommend to most DIYers. The stainless steel construction means it won’t rust out in five years like cheaper galvanized points. We like the 60-mesh screen—it’s a good balance between filtering fine sand and maintaining flow. The included drive cap is solid, and installation is genuinely straightforward for beginners.
- Corrosion-resistant stainless steel
- 60-mesh screen works in most sandy soils
- Includes drive cap for easy installation
- Very affordable entry point
- Only for shallow wells in soft soil
- Basic instructions could be clearer
Three Wings 60mm Super Hard Alloy Drill Bit
If you’re renting an electric drilling rig, this bit is worth having. The hard alloy cuts through compacted soil and soft rock much better than standard bits. It’s not for hand drilling—you need the torque of a machine. We’ve seen similar bits fail in rocky conditions, but this one held up better than expected for the price.
- Hard alloy construction for durability
- Good for compacted soils and soft rock
- Standard 1-inch pipe connection
- Requires electric or gas drilling rig
- Not for extremely hard rock formations
Tapping Into Water: Low-Tech Well Drilling Techniques
This book is gold. Seriously. It’s written by people who’ve actually drilled wells in developing countries, not just armchair experts. The techniques are practical, low-cost, and field-tested. It covers everything from site selection to hand pump installation. If you’re serious about DIY well drilling, spend the $11. You’ll refer to it constantly.
- Real-world, field-tested techniques
- Covers the entire process from start to finish
- Focus on low-cost, accessible methods
- Some methods are very labor-intensive
- Not focused on modern power tools
Budget Electric Options
For those wanting more power without the professional price tag, AliExpress has some interesting portable rigs. We haven’t tested these long-term, but the specs look promising for small farms.
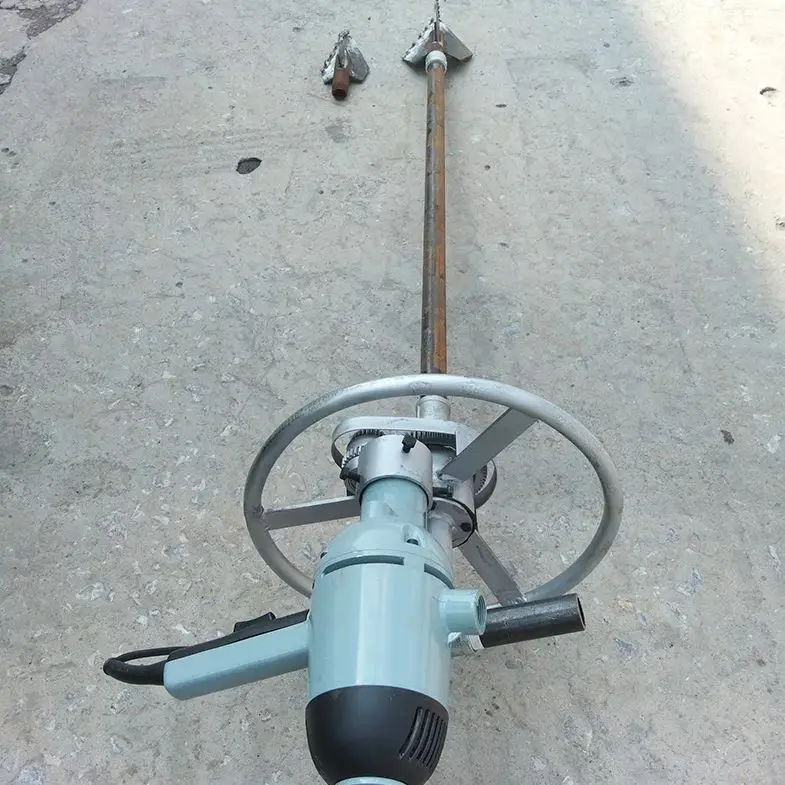
Portable Electric Water Well Drilling Rig (60m)
This is for the ambitious DIYer. It claims 60-meter depth capability, which is serious for a portable unit. The high torque motor should handle tougher soils than hand methods. At $220, it’s a fraction of professional rig rental costs. Just understand—you’re buying from an overseas seller, so support might be limited.
- Electric power reduces physical labor
- 60m depth rating is impressive for DIY
- Significantly cheaper than professional rigs
- Unknown long-term reliability
- May require modifications for your soil
- Shipping and support uncertainties
Frequently Asked Questions
- How deep can I drill with DIY methods?
- Most DIY methods work well under 100 feet. Driven-point systems max out around 50 feet in ideal conditions. Jetting can go deeper. If you need 150+ feet, you’ll likely need professional equipment.
- Do I need a permit for a DIY water well?
- Almost always yes. Regulations vary widely, but most areas require permits, setbacks from septic systems, and sometimes water rights documentation. Check with your local health department first—it’s not optional.
- What if I hit rock while drilling?
- That’s usually the end of the DIY road. You can try a rock bit with a powerful drill, but solid bedrock often means calling a professional with a rotary rig. It’s frustrating, but it happens.
- How do I know if my water is safe to drink?
- Test it. No exceptions. Send a sample to a certified lab for bacteria, nitrates, and local contaminants. Even if it looks clear, it might need treatment. Systems like a 4 stage filter can handle many common issues.
- Can I use a DIY well for my whole house?
- Possibly, but it depends on flow rate and water quality. You’ll need a pump, pressure tank, and robust filtration. For showering, consider a berkey shower filter or handheld shower filter to remove chlorine if you’re treating the water.
- What’s the biggest mistake DIY drillers make?
- Not checking soil conditions first. We’ve seen people spend days trying to drive through clay that won’t budge. Do a test hole with an auger or post-hole digger. Know what you’re getting into.
Final Thoughts
DIY water well drilling isn’t a weekend project for the faint of heart. It’s demanding work with real risks. But for the right person in the right location, it’s incredibly empowering. You’ll learn more about your land and your water than any contractor could teach you.
Start small. Maybe a driven-point well for irrigation first. Get your hands dirty—literally. If it works, you can expand. If it doesn’t, you’ve lost little money and gained priceless experience. That’s how most of the successful DIYers we know started.